
To navigate forward and backward, click on the arrow-buttons ← and → on the bottom
or on your keyboard. Alternatively, click on the purple circles to go to the next step.
The reply box is your daily tool for communicating with customers, so it's worth taking the time to familiarize yourself with it. Investing in its set-up and customization can greatly enhance your daily workflow and communication with customers.
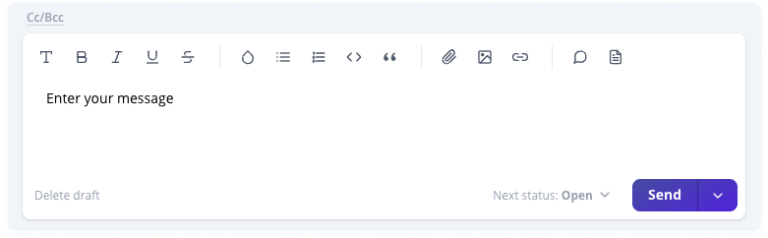
The reply box has multiple functions to write and to design your message.
Fields / Functions | Description |
|---|---|
| Change the text format to
|
| Change the text format to bold (and backward) |
Italic | Change the text format to italic (and backward) |
Underline | Change the text format to underline (and backward) |
| Strikeout text |
Font Color | Change the color of the font |
Bullet List |
|
|
|
Code Block | Enter some code |
|
|
Upload Attachment | Upload an attachment |
Add Image | Upload an image to the text
|
| Mark text and add a link |
Quick Replies | Use text snippet templates to enter them into your message.
For more information, check the article Quick Replies. |
| Opens a search bar to search in your docs articles. Preview articles to find the solution and share the link in the message. Perfect to find the answer to your customer's question. |
AI | Various AI features that support you when replying to tickets and make everyday support work easier.
Click here for more details. |
| The message is automatically saved as a draft. You can delete the draft at any time. |
Next status: ... | Select the status of the ticket after you send the message. It will stay as default until you change it. |
Send | Click on the button to send the message. If you click on the arrow, you can
A signature can add automatically. Check the Settings → Channels → Channel to configure the signature. |
 Style
Style Bold
Bold  Strike
  Ordered List
  Quote
Quote  Add Link
  Search Docs
  Delete draft